Wednesday, December 26, 2012

Teachers Gift Sneak....

Hello everyone!!!

Tarrah here with you today! I hope you are all still in Christmas mode and enjoying yourselves like I am!!! 
Just thought I would share a little sneak peak at something I made for my eldest sons teachers this year....to see what I actually made for them, you will have to hop on over to my blog here and see the finished project!!


Thanks so much for stopping by today, enjoy the remaining days of your celebrations.......be safe and a happy new year to you all too!!

Tarrah :)

Pin It

Friday, December 21, 2012

Merry Christmas!


Pin It

Wednesday, December 19, 2012

Its Beginning to Look a Lot Like Christmas....

Hello everyone,
Tarrah here with you today to show you how I created a festive layout using the gorgeous FabScraps Christmas range and also using the beautiful FabScraps Christmas Chipboard pieces.

Products Used: FabScraps Christmas Chipboard 'Reindeer' and 'Merry' word
                        FabScraps Christmas 'Bells and Whistles' Paper
                        FabScraps Christmas 'Victorian Angels' Paper
                        FabScraps Christmas 'Little Children' Paper
                        FabScraps Christmas 'Santa's Little Helper' Paper
                        FabScraps Pearls and Brads
                        X-Press It Clear Gel
                        X-Press It 6MM Double Sided Tape
                        X-Press It Glue Marker
                                     

I started by trimming my papers to size and placing them where I wanted them. I also used some tape as well.

I used a scallop punch for the edges of the 'Santa's Little Helper' paper..

I wanted a nice shiny finish on my chipboard pieces so I chose a metallic gold colour and you will see in the finished layout that it goes well with the Santa throne in my photo.

I used a brown ink to colour him and then used a red pearl for his nose..

The chipboard nice and dry now...

I adhered some FabScraps pearls on to my layout with the fabulous X-Press It Glue Marker

I matted my photo on to black cardstock.....see the gold on the throne? 

Here is my finished layout.....the gold chipboard really sets off my photo of my eldest son when he was just 3 years old sitting on Santa's knee!!!! 

Thanks so much for stopping by the FabScraps blog today, I hope I have inspired you to create something festive!!
I would like to wish all our lovely followers and their families a very Merry Christmas and a safe and happy New Year ahead.
Take care...
Tarrah

Pin It

Wednesday, December 12, 2012

Have a Fab Christmas

Sharmaine here with just a peek at something I created using FabScraps Christmas lines.

FabScrapsSneak1212

I have blogged the full version and you can see it on my blog
I’d love to have you visit.
In the mean time I hope you all have a wonderful Christmas and I look forward to sharing more with you in 2013.
Take care,

Sharmaine

Pin It

Wednesday, December 5, 2012

It’s A Cracker Of A Christmas

Hi everyone, Sharmaine here with a really quick Christmas Craft idea.
Products I have used:
FabScraps Christmas Flowers
FabScraps Victorian Angels paper
FabScraps Pearl Brad
X-Press It 6mm Double Sided tape
IMG_3809
Did you know that FabScraps have die cut packs that come with instructions??
I mean, how easy does that make things?!
I like easy and I like it when it doesn’t take too much time.
Enter Christmas Crafting Day 1 and the FabScraps Christmas flowers
These gorgeous Christmas flowers come pre-cut and the instructions make it really easy to make your own flowers.
IMG_3797
I just pushed out a few, using the various sizes and colours, and topped them off with a pearl brad.
EASY (and super quick)
Next up I decided to use my cutting machine and make a Christmas cracker.
Again super quick and easy.
I’ve used the “Victorian Angels” paper, found in the Christmas range from FabScraps
IMG_3798
The paper is a great weight, perfect for the cracker, and the print is gorgeous.
I then constructed the cracker and added the FabScraps Christmas flower.
Quick, easy… love!
IMG_3807
AND FabScraps also has a line of die cut (with instructions) to make your own Christmas Crackers!! How cool is that?!
I just love the little things that makes crafting a breeze, especially at this time of year!
Don’t you?

Are you following us on our facebook page? Make sure you do. Then you can keep up with the latest FabScraps news! Pin It

Wednesday, November 28, 2012

Little Tag, Perfect Finishing Touch!

A lot of images that you take the time to colour don't need too much else on the card front, but still need a little bit of interest.... FabScraps Sticker Tags are a perfect little embellishment to add interest without taking too much away from your main image... the perfect size for a little sentiment and a pass of lace, or you could of course cover them with your favourite FabScraps Paper first!

So many options for these sweet little tags, colour them, cover them, love them! Pin It

Wednesday, November 21, 2012

Ornament Bursts

I had originally intended to use these FABulously Christmas themed Mini Chipboard Albums quite traditionally, but when I realised that there was the perfect number of pages to put together these bursting Christmas Decorations there was no turning back!!

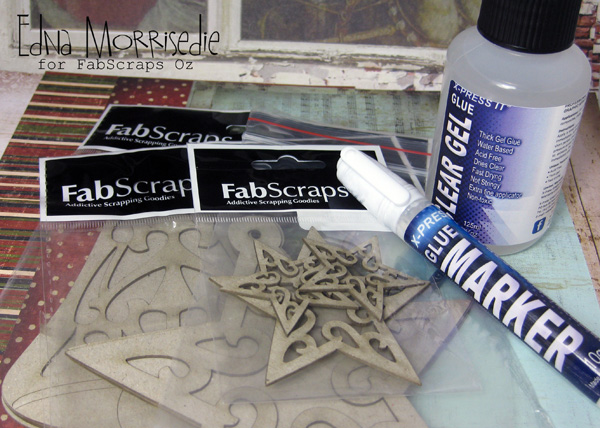
Here is what I started with:

FabScraps Chipboard is gloriously thin, whilst maintaining a sturdy structure, which makes it perfect for paper craft projects of all varieties.  To prepare for the construction of the “bursts” take two pages from each album pack and break the surface of the chipboard by running a scalpel down the centre of the two separate pages.  Fold the outer edges towards one another to break the seal and shape the chipboard.  For each album pack you should have: two folded pages, one flat page, and a front panel.


I selected two sets of FabScraps papers one in traditional reds and greens (star) and the other in lighter blue hues (bell).   Select and allocate alternate papers for both sides of each page, before securing the papers to the chipboard with Triple Tac.  Leave the pages to dry for 30 minutes, or apply heat with a heat gun.  Once dry, file away the excess paper from the edges of each page. 


Select a series of Copic Markers that will work well but contrast with your paper selections.  Add the selected colours directly to the die-cut chipboard (front panels).  Copics are an easy way to achieve fast, dry and matt finishes to any form of chip or foam board…. A great trick to have up your sleeve.  In this project I coloured the star in one flat red tone, and mixed up the colours on the bell.
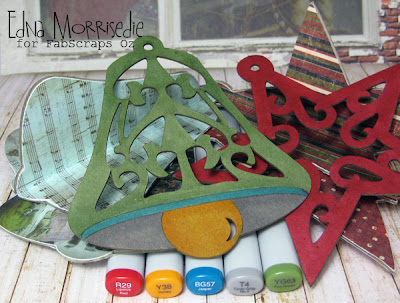

Ink the edges on all pieces with a brown stain.  Apply the same stain to the edges and detail of the front panels to bring them into keeping with the vintage look of the papers.  Use Triple Tac to stick the two sides of the folded pages together to form the “bursts”.  Once these are formed, run X-Press It Double Sided High Tack Tape across the join/seam.  This is where you will secure the flat page which forms the front of the “burst” and housing for the front panel, for my ornaments I have placed twine in the seam prior to pressing the pieces together to form “hangers” for my ornaments.  The front panel is attached directly to the top with X-Press It Clear Gel Glue.


It’s always a good idea to hold the “bursts” at the angle you would like them to remain.  I have used two different techniques on this project.  On the star ornament, I have coloured the two small stars from the FabScraps Christmas Star pack and positioned them to hold the outer edges in place.  


On the bell ornament I have used rhinestones in the creases of each of the “bursts” to hold them at the preferred angle.  I like to call these spacers, and they are easily secured with X-Press It Clear Gel Glue.


To finish, I have dressed the star ornament with the additional large star in the Christmas Star pack.  This is coloured on both sides with YG63.  Pearls have been added to the bell with X-Press It Glue Marker, one directly to the front and the others to the hanger string.  I have pressed two half pearls together around the string to provide the illusion of a bead.


Here are the FabScraps products I used in my project today:
FabScraps Papers:
Victorian Children, Victorian Angels, Little Children, Santa's Helper, Star Sparkles
FabScraps Bell Tag Album
FabScraps Star Tag Album
FabScraps Christmas Star (1 Large, 2 Small)
FabScraps Half Pearls


Here are the X-Press It products I used in my project today:
X-Press It Clear Gel Glue
X-Press It Glue Marker
X-Press It TripleTac
X-Press It 6mm Double Sided Tape High

Here are the Copic Markers I used in my project today: 
R29 Lipstick Red
Y38 Honey
BG57 Jasper
T4 Toner Gray No. 4
YG63 Pea Green

Thanks so much for visiting this tutorial, I hope it provides you with some ideas for how to use your FabScraps Papers, and embellishments.... use the albums in a traditional way, or make up a swag of these fabby decorations!!
Pin It