Thanks for following the FabScraps Oz Blog! Based of feedback, we have decided to incorporate this blog with our X-Press It Blog.
So, for more exciting FabScraps posts, check out the X-Press It Blog and be sure to follow us on our Facebook page.
All of the wonderful tutorials on this blog, will be incorporated into the X-Press It Blog.
Pin It

Wednesday, January 23, 2013
Wednesday, January 16, 2013
Getting FABScraps FANcy with a METal Catch
Thanks for joining us at the FabScraps Oz Blog for another FABulous FabScraps Project, this time I focussed my project on the FABulous Brass FabScraps Fancy Metal Catch. There are a couple of different varieties of FabScraps "Buckles", this one has a fancy little hook closure between the two sides, so it is nice and secure and as such I thought it would make a good element on a little handmade journal. Here is what I started with today:

I opted to use a combination of fabric and paper for my journal cover. Of course you could also use card in place of fabric…. I split one piece of FabScraps Heritage Floral paper in half vertically to get the whole cover out of one piece of paper, trimming back the RHS to allow the flap to come around for the closure (more on this later). I applied X-Press It TripleTac to the back of the two pieces of paper and then pressed them to the fabric which I cut a little larger than the paper (room for error), then I trimmed the fabric back to the paper edge. This leaves you with a long strip with a seam in the centre, which I covered with a dense zigzag stitch, which also goes all the way around the edge of the cover.

For the inside, I covered a piece of book board with a strip of FabScraps Heritage Script 2 paper, securing again with X-Press It TripleTac. I think it’s best to stick the paper to the board and let this dry before then using TripleTac to secure the board to the inside bottom of the cover (board to fabric). In this case I also inked the edge of the covered book board with a co-ordinating Copic Marker, before I secured it to the fabric.

TIP FOR USING FABRIC: Be sure to use something with a chunky weave, this is actually brown denim that I have had in my fabric box for some time, it is quite heavy and held form well with the paper over the top, and co-ordinated really well with the papers, and my brown loving heart!!!
If you are using a one sided fabric be sure to stick the paper to the back of the fabric, so that the fabric pattern becomes a feature on the inside of your journal, in my case I kept the brown.
At this stage you would have the option to build a little set of photo sleeves or sheets, or do as I have done and insert journal pages. I have fancied these up a little with a cover strip of FabScraps Heritage Floral paper and some more FabScraps Brass Embellishments. I used X-Press It 6mm Double Sided High Tack Tape to secure the pages together, nice and strong for continued use, both in the stage of writing the journal, and reading it in the years ahead.
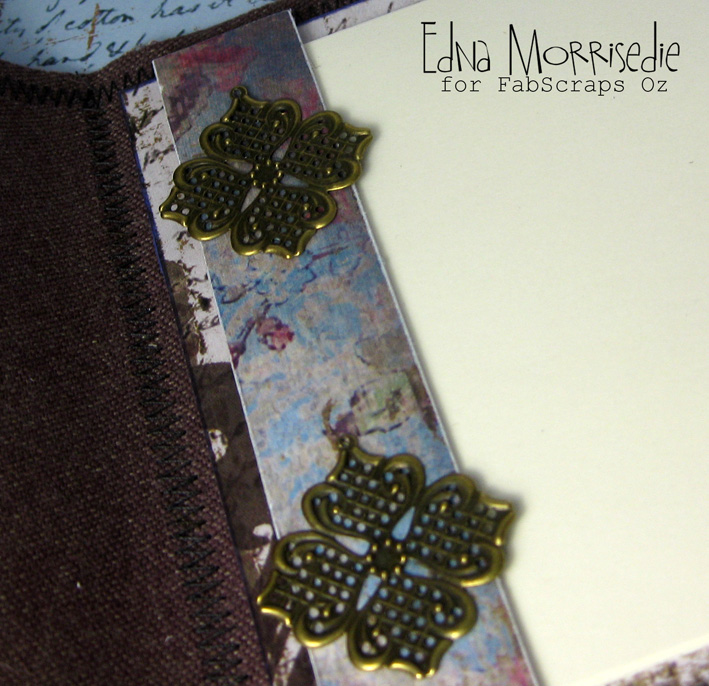
Then it was time to finish the cover. The placement of the brass closure needs to be done first as it is really important to get the alignment right. I achieved this by joining both sides together and closing the latch, applied X-Press It Clear Gel Glue to the centre back of each side, then flipped over and secured direct to the edges of the front and back cover as shown. The stitching is really just cosmetic, as the Clear Gel Glue is super strong!!

And then to the lovely stack of embellishments…. I wanted to stick with a matt finish, so opted to colour the chipboard pieces with Copic Markers. If you are not sure how deep the colour will be on your chipboard, do a few test swipes on the BACK of your chipboard pieces before choosing which colours…. I chose a deep pink and mid-range purple to bring out some of the colours in the paper. Once the chipboard was coloured, it was as easy as building the embellishment stack with X-Press It Clear Gel Glue…. Here is the stack order: Photo Circle Swirl Frame, Filigree Frame (I cut the tab off), Life Story Chipboard, Brass Cameo. Note: I centred each layer from the bottom up so that the Cameo was then centred in the Brass Photo Ring, and the middle opening in the Photo Circle Swirl Frame.

The embellishment stack was also secured to the front of the journal with X-Press It Clear Gel Glue. These would be fun to make up for your friends and family, either in this size as a journal, or smaller sizes for notebooks…. Or any size you like for scrapbook covers….

Here are the FabScraps products I used in my project today:
- FabScraps Papers: Heritage Floral and Heritage Script 2
- FabScraps Photo Circle Swirl Frame
- FabScraps Life Story with Clock (which I covered with the Cameo)
- FabScraps Fancy Metal Catch, Brass Embellishments Filigree Frame and Cameo
Here are the X-Press It products I used in my project today:
- X-Press It Clear Gel Glue
- X-Press It TripleTac
- X-Press It 6mm Double Sided High Tack Tape.
Thanks so much for visiting the FabScraps Oz Blog today, I hope you have enjoyed seeing the papers and embellishments take the form of a journal, I love the FabScraps metal catches and embellishments mixed with chipboard, so many ways to put them to good use, and have fun while you’re at it!!
Pin It
Wednesday, January 2, 2013
Fun with Bunting!

Hi there, its Sascha from FabScraps HQ. On the behalf of FabScraps Team I would like to wish you a Happy New Year! Now that the silly season is over, the impromptu backyard barbeques and parties begin! A quick, fun and cheap way to dress up your backyard is with some paper bunting. There are all sorts of shapes you can make your bunting flags, but today I have gone with the traditional triangles. I made over 2 metres of bunting with 3 sheets of 12x12 paper from the FabScraps Summer Collection, X-Press It 6mm Double Sided Tape and twine.

1. Make yourself a template. It makes dividing your page up
much easier. I got 6 even Triangles out of each piece of paper. I placed the
template on the page and marked the lines I needed to cut.
2. Cut the triangles out with a knife or scissors.
3. Place a strip of X-Press It double Sided Tape along the
top, on the reverse side of each triangle.
4. Gently score a fold line next to your tape; this will
make your bunting much neater.
5. Remove the tape backing and lay the twine next to the
tape. Fold the paper over along your score line.
6. Press the tape down firmly. I used the back of a pen to
force the paper to fold and stick. Repeat with each flag, alternating the
colours. I left 3-4cm between each flag.
Voila! Instant party decorations! Have you made your own
bunting before? We would love to see your creations. Thanks for stopping by!
Pin It
Wednesday, December 26, 2012
Teachers Gift Sneak....
Hello everyone!!!
Tarrah here with you today! I hope you are all still in Christmas mode and enjoying yourselves like I am!!!
Just thought I would share a little sneak peak at something I made for my eldest sons teachers this year....to see what I actually made for them, you will have to hop on over to my blog here and see the finished project!!

Thanks so much for stopping by today, enjoy the remaining days of your celebrations.......be safe and a happy new year to you all too!!
Tarrah :)
Friday, December 21, 2012

Wednesday, December 19, 2012
Its Beginning to Look a Lot Like Christmas....
Hello everyone,
Tarrah here with you today to show you how I created a festive layout using the gorgeous FabScraps Christmas range and also using the beautiful FabScraps Christmas Chipboard pieces.
Products Used: FabScraps Christmas Chipboard 'Reindeer' and 'Merry' word
FabScraps Christmas 'Bells and Whistles' Paper
FabScraps Christmas 'Victorian Angels' Paper
FabScraps Christmas 'Little Children' Paper
FabScraps Christmas 'Santa's Little Helper' Paper
FabScraps Pearls and Brads
X-Press It Clear Gel
X-Press It 6MM Double Sided Tape
X-Press It Glue Marker
FabScraps Christmas 'Victorian Angels' Paper
FabScraps Christmas 'Little Children' Paper
FabScraps Christmas 'Santa's Little Helper' Paper
FabScraps Pearls and Brads
X-Press It Clear Gel
X-Press It 6MM Double Sided Tape
X-Press It Glue Marker

I started by trimming my papers to size and placing them where I wanted them. I also used some tape as well.

I used a scallop punch for the edges of the 'Santa's Little Helper' paper..

I wanted a nice shiny finish on my chipboard pieces so I chose a metallic gold colour and you will see in the finished layout that it goes well with the Santa throne in my photo.

I used a brown ink to colour him and then used a red pearl for his nose..

The chipboard nice and dry now...

I adhered some FabScraps pearls on to my layout with the fabulous X-Press It Glue Marker

I matted my photo on to black cardstock.....see the gold on the throne?

Here is my finished layout.....the gold chipboard really sets off my photo of my eldest son when he was just 3 years old sitting on Santa's knee!!!!

Thanks so much for stopping by the FabScraps blog today, I hope I have inspired you to create something festive!!
I would like to wish all our lovely followers and their families a very Merry Christmas and a safe and happy New Year ahead.
Take care...
Tarrah
Take care...
Tarrah
Pin It
Wednesday, December 12, 2012
Have a Fab Christmas
Sharmaine here with just a peek at something I created using FabScraps Christmas lines.
I have blogged the full version and you can see it on my blog
I’d love to have you visit.
In the mean time I hope you all have a wonderful Christmas and I look forward to sharing more with you in 2013.
Take care,

Sharmaine
Pin It
Subscribe to:
Posts (Atom)